

Visual Citations with Bounding Boxes
Use bounding boxes and screenshots to show exactly where information was found in a document.
When building agents or RAG workflows, it is often not enough to parse text and call it done. Frequently, users and applications will require you to show where that text came from.
LiteParse gives you spatial coordinates for every text item, plus page screenshots, so you can highlight exact regions on the rendered page.
How bounding boxes work
Section titled “How bounding boxes work”When you parse a document with JSON output, each page includes a key data source for visual citations: textItems. Every extracted text element with its position (x, y, width, height) and content.
$ lit parse document.pdf --format json{ "pages": [{ "page": 1, "width": 612, "height": 792, "text": "...", "textItems": [ { "text": "Revenue grew 15%", "x": 72, "y": 200, "width": 150, "height": 12, ... } ], }]}Coordinates are in PDF points (1 point = 1/72 inch). Origin is the top-left corner of the page, with X increasing right and Y increasing down.
Library usage
Section titled “Library usage”The library lets you do both in a single script, parse for bboxes and generate screenshots. For example, you might be looking for specific information like “Revenue” and want to show exactly where it appears on the page:
import { LiteParse } from "@llamaindex/liteparse";
const parser = new LiteParse({ outputFormat: "json", dpi: 150 });
const result = await parser.parse("report.pdf");const screenshots = await parser.screenshot("report.pdf");
// Find a text item by its contentfor (const page of result.json?.pages || []) {  for (const item of page.textItems) {    if (item.text.includes("Revenue")) {      console.log(`Found on page ${page.page}: (${item.x}, ${item.y}) ${item.width}×${item.height}`);    }  }}
Converting coordinates to image pixels
Section titled “Converting coordinates to image pixels”Text item coordinates are in PDF points, but screenshots are in pixels. To draw highlights on a screenshot, you need to scale the coordinates:
const scaleFactor = dpi / 72; // PDF points → pixels at your chosen DPI
function itemToPixels(item, dpi = 150) {  const scale = dpi / 72;  return {    x: item.x * scale,    y: item.y * scale,    width: item.width * scale,    height: item.height * scale,  };}
For example, at the default 150 DPI the scale factor is 150 / 72 ≈ 2.08, so a text item at (72, 200) maps to pixel (150, 416).
Searching for phrases with searchItems
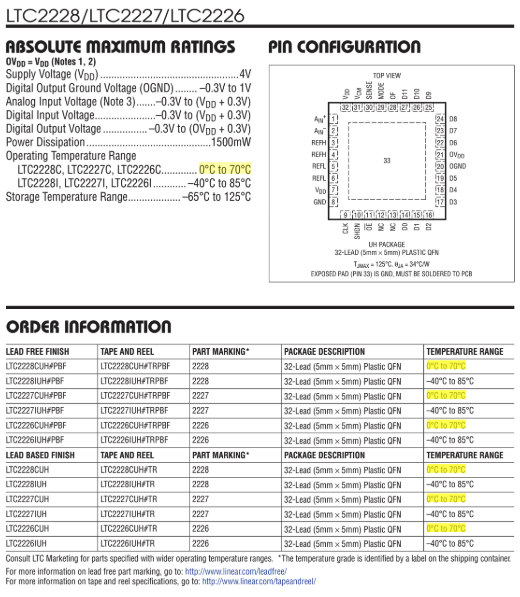
Section titled “Searching for phrases with searchItems”A single text item often contains just one word or fragment. A phrase like "0°C to 70°C" may span several adjacent items. The searchItems utility handles this — it concatenates consecutive items, finds matches, and returns merged text items with combined bounding boxes:
import { LiteParse, searchItems } from "@llamaindex/liteparse";
const parser = new LiteParse({ outputFormat: "json" });const result = await parser.parse("report.pdf");
for (const page of result.json.pages) {  const matches = searchItems(page.textItems, { phrase: "0°C to 70°C" });  for (const match of matches) {    console.log(`Found "${match.text}" at (${match.x}, ${match.y}) ${match.width}×${match.height}`);  }}
Each returned item has the same shape as a regular text item, with merged coordinates spanning all the items that contributed to the match.
For single-word searches, iterating textItems individually (as shown in the library usage section above) is simpler and works fine.
Full example: highlighting citations with sharp
Section titled “Full example: highlighting citations with sharp”Here’s a complete workflow that parses a PDF, searches for a phrase, and draws yellow highlight boxes on the page screenshot:
import { LiteParse, searchItems } from "@llamaindex/liteparse";import sharp from "sharp";
const DPI = 150;const SCALE = DPI / 72;
async function main() {  const parser = new LiteParse({ outputFormat: "json", dpi: DPI });
  const result = await parser.parse("manual.pdf");  const screenshots = await parser.screenshot("manual.pdf");
  // Search for a phrase, grouped by page  const query = "0°C to 70°C";  const hitsByPage = new Map<number, Array<{ x: number; y: number; width: number; height: number }>>();
  for (const page of result.json?.pages || []) {    const matches = searchItems(page.textItems, { phrase: query });    if (matches.length) hitsByPage.set(page.page, matches);  }
  // Draw all highlights per page into a single image  for (const [pageNum, rects] of hitsByPage) {    const shot = screenshots.find((s) => s.pageNum === pageNum);    if (!shot) continue;
    const composites = await Promise.all(      rects.map(async (rect) => {        const pixel = {          left: Math.round(rect.x * SCALE),          top: Math.round(rect.y * SCALE),          width: Math.round(rect.width * SCALE),          height: Math.round(rect.height * SCALE),        };
        const overlay = await sharp({          create: {            width: pixel.width,            height: pixel.height,            channels: 4,            background: { r: 255, g: 255, b: 0, alpha: 0.3 },          },        })          .png()          .toBuffer();
        return { input: overlay, left: pixel.left, top: pixel.top };      })    );
    const highlighted = await sharp(shot.imageBuffer)      .composite(composites)      .png()      .toBuffer();
    await sharp(highlighted).toFile(`citation_page${pageNum}.png`);    console.log(`Saved citation_page${pageNum}.png (${rects.length} highlights)`);  }}
main().catch(console.error);
Running this script on a PDF will produce new images with the search phrase highlighted, showing exactly where the information was found on the page.
CLI usage
Section titled “CLI usage”Parse to JSON to get bounding boxes:
lit parse document.pdf --format json -o result.jsonGenerate page screenshots alongside:
lit screenshot document.pdf -o ./screenshotsFrom there, you (or an agent) can process the resulting JSON and screenshots as needed using any tools available.
Deprecated: boundingBoxes
Section titled “Deprecated: boundingBoxes”The boundingBoxes array in JSON output is deprecated and will be removed in v2.0. It is a redundant representation of the same spatial data already available on each text item (x, y, width, height). Use textItems directly instead — it has the same coordinates plus text content, font metadata, and consistent indexing.
- Use the same
dpivalue for bothparse()andscreenshot(). The default is150for both. - Page
widthandheightin the JSON are in PDF points, matching the coordinate space. Use these if you need to normalize coordinates to percentages.