

Azure AI Search
Configure via UI
Section titled “Configure via UI”We can load data by using two different types of authentication methods:
1. API Key Authentication Mechanism
Section titled “1. API Key Authentication Mechanism”
2. Service Principal Authentication Mechanism
Section titled “2. Service Principal Authentication Mechanism”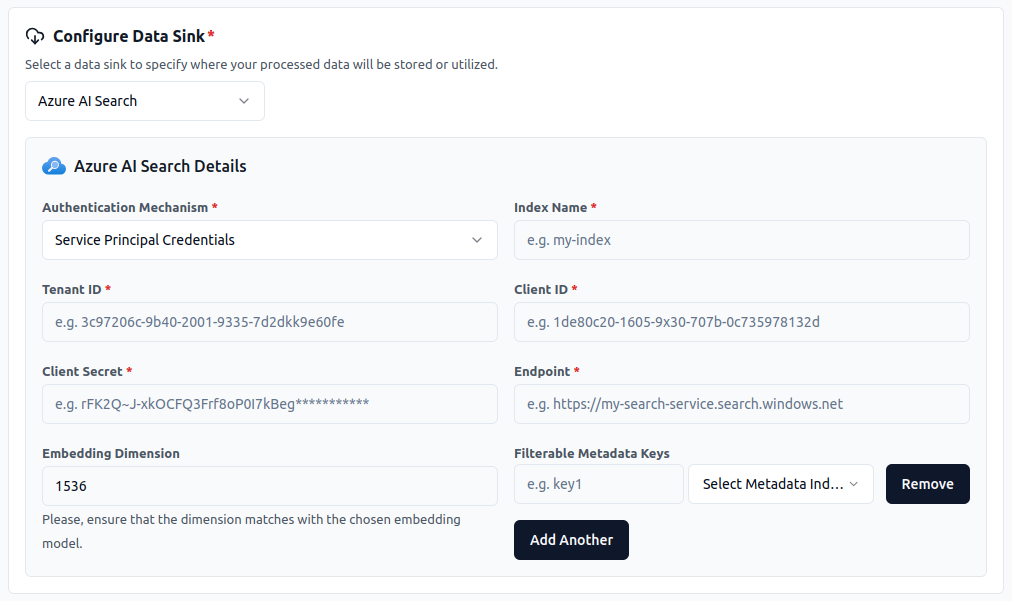
Configure via API / Client
Section titled “Configure via API / Client”from llama_cloud.types.data_sink_create_params import ( CloudAzureAiSearchVectorStore,)
data_sink = client.data_sinks.create( name="my-data-sink", component=CloudAzureAiSearchVectorStore( index_name='<index_name>', search_service_api_key='<api_key>', search_service_endpoint='<endpoint>', embedding_dimension='<embedding_dimension>', # optional (default: 1536) filterable_metadata_field_keys='<insert_filterable_metadata_field_keys>', # optional ), sink_type="AZUREAI_SEARCH",)const ds = { 'name': 'azureaisearch', 'sinkType': 'AZUREAI_SEARCH', 'component': { 'index_name': '<index_name>', 'search_service_api_key': '<api_key>', 'search_service_endpoint': '<endpoint>', 'embedding_dimension': '<embedding_dimension>', // optional (default: 1536) 'filterable_metadata_field_keys': '<insert_filterable_metadata_field_keys>', // optional }}
const dataSink = await client.dataSinks.create({ name: 'my-data-sink', component: { index_name: '<index_name>', search_service_api_key: '<api_key>', search_service_endpoint: '<endpoint>', embedding_dimension: '<embedding_dimension>', // optional (default: 1536) filterable_metadata_field_keys: '<insert_filterable_metadata_field_keys>', // optional }, sink_type: 'AZUREAI_SEARCH',});2. Service Principal Authentication Mechanism
Section titled “2. Service Principal Authentication Mechanism”from llama_cloud.types.data_sink_create_params import ( CloudAzureAiSearchVectorStore,)
data_sink = client.data_sinks.create( name="my-data-sink", component=CloudAzureAiSearchVectorStore( index_name='<index_name>', client_id='<client_id>', tenant_id='<tenant_id>', client_secret='<client_secret>', endpoint='<endpoint>', embedding_dimensionality='<embedding_dimensionality>', # optional filterable_metadata_field_keys='<filterable_metadata_field_keys>' # optional ), sink_type="AZUREAI_SEARCH",)const dataSink = await client.dataSinks.create({ name: 'my-data-sink', component: { index_name: '<index_name>', client_id: '<client_id>', tenant_id: '<tenant_id>', client_secret: '<client_secret>', endpoint: '<endpoint>', embedding_dimensionality: '<embedding_dimensionality>', // optional filterable_metadata_field_keys: '<filterable_metadata_field_keys>' // optional }, sink_type: 'AZUREAI_SEARCH',});Filterable Metadata Field Keys
Section titled “Filterable Metadata Field Keys”The filterable_metadata_field_keys parameter specifies the fields that are used for filtering in the search service.
The type of the field specifices whether the field is a string or a number. The format is as follows:
The value being passed is just for identification purposes. The actual values of the fields will be passed during the insert operation or retrieval.
{ "field1": "string", "field2": 0 "field3": false "field4": []}So for example, if you have a field called age that is a number, you would specify it as follows:
{ "age": 0}If you have a field called name that is a string, you would specify it as follows:
{ "name": "string"}If you have a field called is_active that is a boolean, you would specify it as follows:
{ "is_active": false}If you have a field called tags that is a list, you would specify it as follows:
{ "tags": []}Enabling Role-Based Access Control (RBAC) for Azure AI Search
Section titled “Enabling Role-Based Access Control (RBAC) for Azure AI Search”This guide will walk you through the necessary steps to enable Role-Based Access Control (RBAC) for your Azure AI Search service. This involves configuring your Azure resources and assigning the appropriate roles.
Prerequisites:
Section titled “Prerequisites:”Azure Subscription:Ensure you have an active Azure subscription.Azure AI Search Service:An existing Azure Cognitive Search service instance.Azure Portal Access:You need sufficient permissions to configure RBAC settings in the Azure Portal.
Step-by-Step Guide:
Section titled “Step-by-Step Guide:”Step 1: Sign in to Azure Portal
Section titled “Step 1: Sign in to Azure Portal”Step 2: Navigate to Your Azure AI Search Service
Section titled “Step 2: Navigate to Your Azure AI Search Service”- In the Azure Portal, use the search bar to find and select “Azure AI Search”.
- Select your search service from the list.
Step 3: Access the Access Control (IAM) Settings
Section titled “Step 3: Access the Access Control (IAM) Settings”- In your search service’s navigation menu, select Access control (IAM).
- You will see a list of roles assigned to the service.
Step 4: Assign Roles to Users or Applications
Section titled “Step 4: Assign Roles to Users or Applications”- Click on + Add and select Add role assignment.
- In the Role dropdown, select a suitable role. For example:
Search Service Contributor:Can manage the search service but not access its content.Search Service Data Contributor:Can manage the search service and access its content.Search Service Data Reader:Can access the content of the search service but cannot manage it.
- In the Assign access to dropdown, choose whether you are assigning the role to a user, group, or service principal.
- In the Select field, find and select the user, group, or service principal you want to assign the role to.
- Click Save to apply the role assignment.
Step 5: Enable Role Based Access Control
Section titled “Step 5: Enable Role Based Access Control”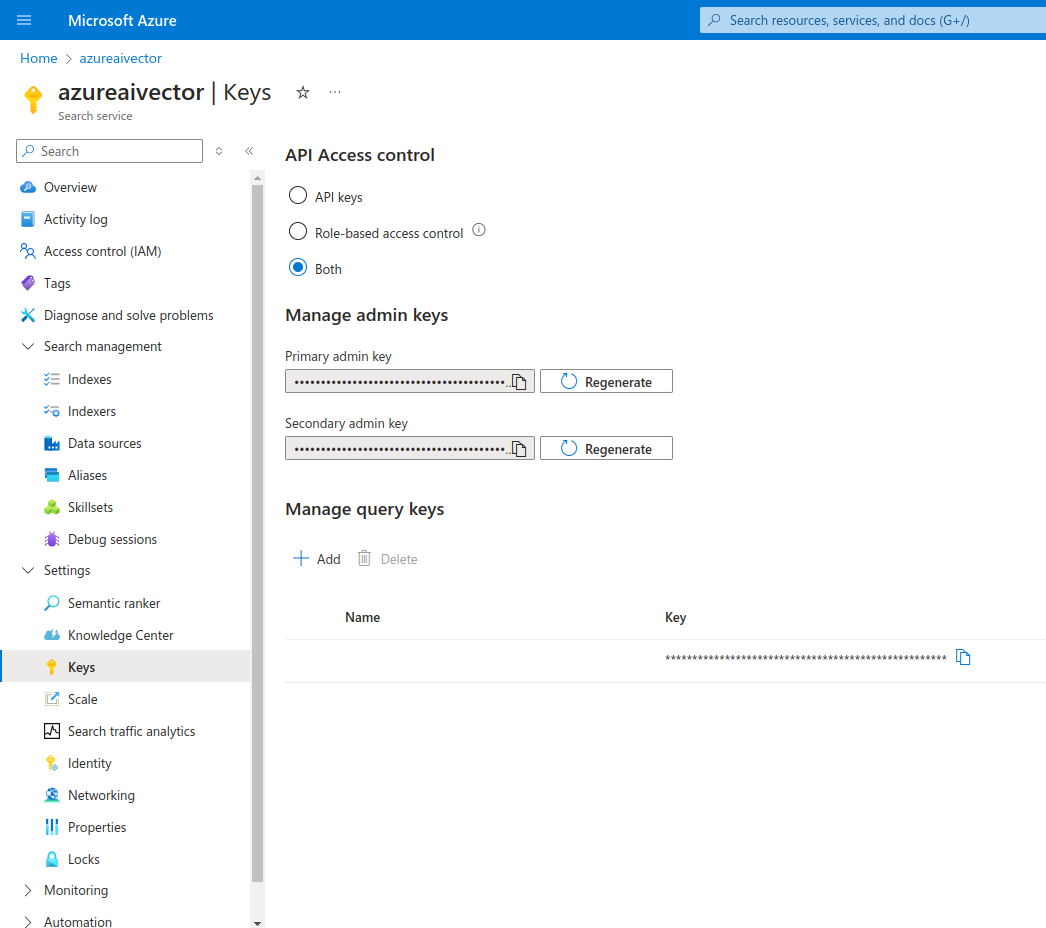
- Select Settings and then select Keys in the left navigation pane.
- Choose Role-based control or Both if you’re currently using keys and need time to transition clients to role-based access control.