

Property Graph Construction with Predefined Schemas
![]()
In this notebook, we walk through using Neo4j, Ollama and Huggingface to build a property graph.
Specifically, we will be using the SchemaLLMPathExtractor which allows us to specify an exact schema containing possible entity types, relation types, and defining how they can be connected together.
This is useful for when you have a specific graph you want to build, and want to limit what the LLM is predicting.
%pip install llama-index%pip install llama-index-llms-ollama%pip install llama-index-embeddings-huggingface# Optional%pip install llama-index-graph-stores-neo4j%pip install llama-index-graph-stores-nebulaLoad Data
Section titled “Load Data”First, lets download some sample data to play with.
!mkdir -p 'data/paul_graham/'!wget 'https://raw.githubusercontent.com/run-llama/llama_index/main/docs/examples/data/paul_graham/paul_graham_essay.txt' -O 'data/paul_graham/paul_graham_essay.txt'--2024-06-26 11:12:16-- https://raw.githubusercontent.com/run-llama/llama_index/main/docs/examples/data/paul_graham/paul_graham_essay.txtResolving raw.githubusercontent.com (raw.githubusercontent.com)... 185.199.110.133, 185.199.109.133, 185.199.111.133, ...Connecting to raw.githubusercontent.com (raw.githubusercontent.com)|185.199.110.133|:443... connected.HTTP request sent, awaiting response... 200 OKLength: 75042 (73K) [text/plain]Saving to: ‘data/paul_graham/paul_graham_essay.txt’
data/paul_graham/pa 100%[===================>] 73.28K --.-KB/s in 0.007s
2024-06-26 11:12:16 (10.4 MB/s) - ‘data/paul_graham/paul_graham_essay.txt’ saved [75042/75042]from llama_index.core import SimpleDirectoryReader
documents = SimpleDirectoryReader("./data/paul_graham/").load_data()Graph Construction
Section titled “Graph Construction”To construct our graph, we are going to take advantage of the SchemaLLMPathExtractor to construct our graph.
Given some schema for a graph, we can extract entities and relations that follow this schema, rather than letting the LLM decide entities and relations at random.
import nest_asyncio
nest_asyncio.apply()
from typing import Literalfrom llama_index.llms.ollama import Ollamafrom llama_index.core.indices.property_graph import SchemaLLMPathExtractor
# best practice to use upper-caseentities = Literal["PERSON", "PLACE", "ORGANIZATION"]relations = Literal["HAS", "PART_OF", "WORKED_ON", "WORKED_WITH", "WORKED_AT"]
# define which entities can have which relationsvalidation_schema = { "PERSON": ["HAS", "PART_OF", "WORKED_ON", "WORKED_WITH", "WORKED_AT"], "PLACE": ["HAS", "PART_OF", "WORKED_AT"], "ORGANIZATION": ["HAS", "PART_OF", "WORKED_WITH"],}
kg_extractor = SchemaLLMPathExtractor( llm=Ollama( model="llama3", json_mode=True, request_timeout=3600, # Manually set the context window to limit memory usage context_window=8000, ), possible_entities=entities, possible_relations=relations, kg_validation_schema=validation_schema, # if false, allows for values outside of the schema # useful for using the schema as a suggestion strict=True,)Now, You can use SimplePropertyGraph, Neo4j, or NebulaGraph to store the graph.
Option 1. Neo4j
To launch Neo4j locally, first ensure you have docker installed. Then, you can launch the database with the following docker command
docker run \ -p 7474:7474 -p 7687:7687 \ -v $PWD/data:/data -v $PWD/plugins:/plugins \ --name neo4j-apoc \ -e NEO4J_apoc_export_file_enabled=true \ -e NEO4J_apoc_import_file_enabled=true \ -e NEO4J_apoc_import_file_use__neo4j__config=true \ -e NEO4JLABS_PLUGINS=\[\"apoc\"\] \ neo4j:latestFrom here, you can open the db at http://localhost:7474/. On this page, you will be asked to sign in. Use the default username/password of neo4j and neo4j.
Once you login for the first time, you will be asked to change the password.
After this, you are ready to create your first property graph!
from llama_index.graph_stores.neo4j import Neo4jPropertyGraphStore
graph_store = Neo4jPropertyGraphStore(    username="neo4j",    password="<password>",    url="bolt://localhost:7687",)vec_store = None
Option 2. NebulaGraph
To launch NebulaGraph locally, first ensure you have docker installed. Then, you can launch the database with the following docker command.
mkdir nebula-docker-composecd nebula-docker-composecurl --output docker-compose.yaml https://raw.githubusercontent.com/vesoft-inc/nebula-docker-compose/master/docker-compose-lite.yamldocker compose upAfter this, you are ready to create your first property graph!
Other options/details for deploying NebulaGraph can be found in the docs:
from llama_index.graph_stores.nebula import NebulaPropertyGraphStorefrom llama_index.core.vector_stores.simple import SimpleVectorStore
graph_store = NebulaPropertyGraphStore(    space="llamaindex_nebula_property_graph", overwrite=True)vec_store = SimpleVectorStore()
If you want to explore the graph with NebulaGraph Jupyter extension, run the following commands. Or just skip them.
%pip install jupyter-nebulagraph# load NebulaGraph Jupyter extension to enable %ngql magic%load_ext ngql# connect to NebulaGraph service%ngql --address 127.0.0.1 --port 9669 --user root --password nebula%ngql CREATE SPACE IF NOT EXISTS llamaindex_nebula_property_graph(vid_type=FIXED_STRING(256));# use the graph space, which is similar to "use database" in MySQL# The space was created in async way, so we need to wait for a while before using it, retry it if failed%ngql USE llamaindex_nebula_property_graph;Start building!
NOTE: Using a local model will be slower when extracting compared to API based models. Local models (like Ollama) are typically limited to sequential processing. Expect this to take about 10 minutes on an M2 Max.
from llama_index.core import PropertyGraphIndexfrom llama_index.embeddings.huggingface import HuggingFaceEmbedding
index = PropertyGraphIndex.from_documents(    documents,    kg_extractors=[kg_extractor],    embed_model=HuggingFaceEmbedding(model_name="BAAI/bge-small-en-v1.5"),    property_graph_store=graph_store,    vector_store=vec_store,    show_progress=True,)
If we inspect the graph created, we can see that it only includes the relations and entity types that we defined!
# If using NebulaGraph Jupyter extension%ngql MATCH p=()-[]->() RETURN p LIMIT 20;%ng_drawOr Neo4j:
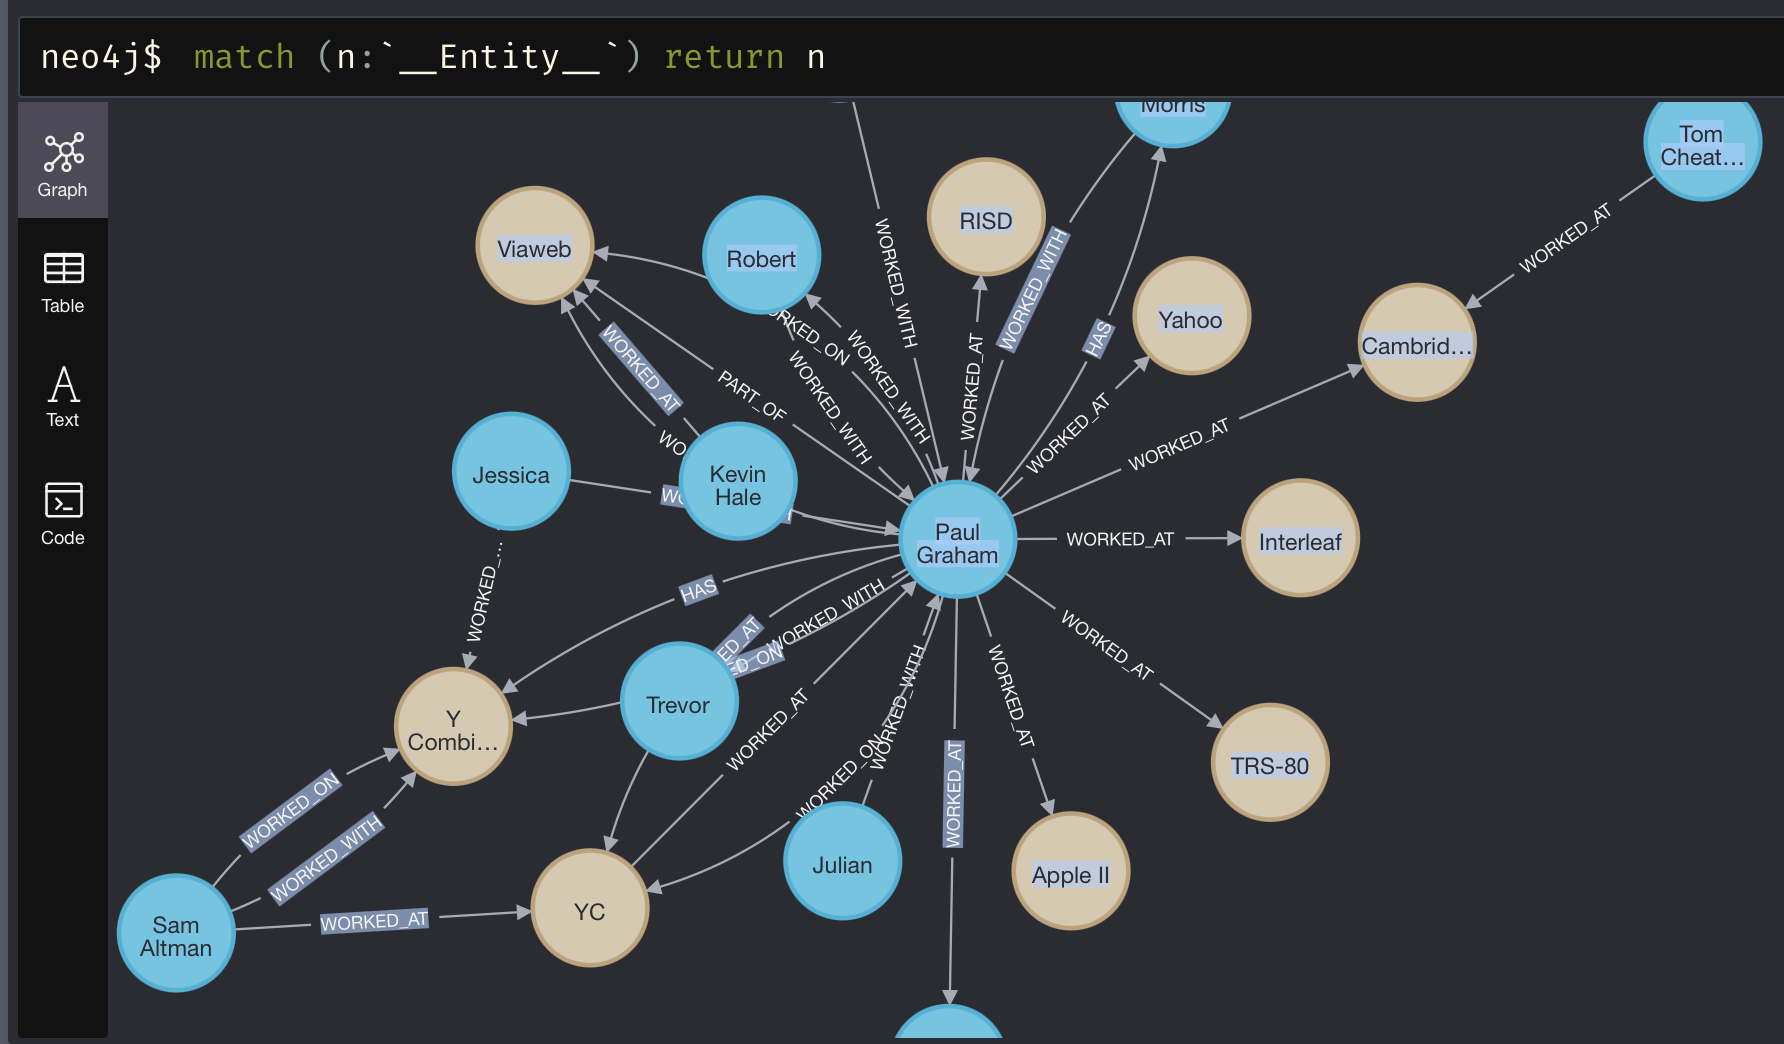
For information on all kg_extractors, see the documentation.
Querying
Section titled “Querying”Now that our graph is created, we can query it.
As is the theme with this notebook, we will be using a lower-level API and constructing all our retrievers ourselves!
from llama_index.core.indices.property_graph import (    LLMSynonymRetriever,    VectorContextRetriever,)

llm_synonym = LLMSynonymRetriever(    index.property_graph_store,    llm=Ollama(        model="llama3",        request_timeout=3600,        # Manually set the context window to limit memory usage        context_window=8000,    ),    include_text=False,)vector_context = VectorContextRetriever(    index.property_graph_store,    embed_model=HuggingFaceEmbedding(model_name="BAAI/bge-small-en-v1.5"),    include_text=False,)
retriever = index.as_retriever( sub_retrievers=[ llm_synonym, vector_context, ])nodes = retriever.retrieve("What happened at Interleaf?")
for node in nodes: print(node.text)Interleaf -> HAS -> Paul GrahamInterleaf -> HAS -> EmacsInterleaf -> HAS -> Release EngineeringInterleaf -> HAS -> ViawebInterleaf -> HAS -> Y CombinatorInterleaf -> HAS -> impressive technologyInterleaf -> HAS -> smart peopleWe can also create a query engine with similar syntax.
query_engine = index.as_query_engine(    sub_retrievers=[        llm_synonym,        vector_context,    ],    llm=Ollama(        model="llama3",        request_timeout=3600,        # Manually set the context window to limit memory usage        context_window=8000,    ),)
response = query_engine.query("What happened at Interleaf?")
print(str(response))
Paul Graham worked there, as well as other smart people. Emacs was also present.For more info on all retrievers, see the complete guide.